dev/aos
[AOS] RecyclerView
donguran
2024. 2. 6. 14:56
728x90
반응형
RecyclerView는 여러 아이템을 리스트 형태로 보여주는 뷰이다.
모든 아이템을 한 꺼번에 로드하여 가지고 있는 것이 아닌 필요한 양 만큼 갱신하여 보여주는 것이 특징
RecyclerView를 현재 Compose에서는 좀더 편리하게 구현을 하고 있다고는 하나,
나는 원래 사용하던 구조가 더 명확히 분리되어 있어 이전 방법을 애용한다.
언어 : Kotlin
1. Layout내부에 RecylcerView를 만든다
<LinearLayout>
	<androidx.recyclerview.widget.RecyclerView
    	android:id="@+id/recyclerItemList"
    	...

        />

</LinearLayout>
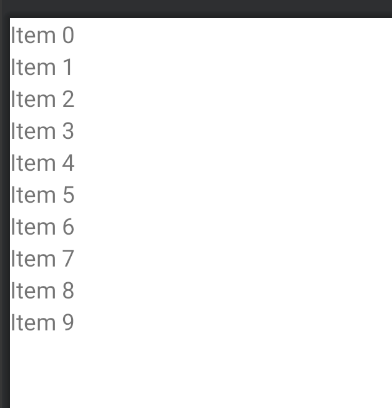
그럼, 화면에 다음과 같이 생성된다.
2. RecyclerView에 들어갈 리스트 아이템의 레이아웃을 만든다.
<LinearLayout
	android:orientation="horizontal">

    <TextView
    	android:id="@+id/textMessage"
    	...
    />

</LinearLayout>
아이템에 카드를 넣고 리플(Ripple)효과 첨가
<?xml version="1.0" encoding="utf-8"?>
<LinearLayout xmlns:android="http://schemas.android.com/apk/res/android"
    xmlns:app="http://schemas.android.com/apk/res-auto"
    android:orientation="horizontal"
    android:layout_width="match_parent"
    android:layout_height="wrap_content">

    <androidx.cardview.widget.CardView
        android:id="@+id/bluetoothCard"
        android:layout_width="match_parent"
        android:layout_height="wrap_content"
        android:layout_margin="4dp"
        android:clickable="true"
        app:cardCornerRadius="8dp"
        app:cardElevation="4dp"
        android:focusable="true"
        android:foreground="?attr/selectableItemBackground">

        <TextView
            android:id="@+id/bluetoothDeviceName"
            android:layout_width="match_parent"
            android:layout_height="wrap_content"
            android:textSize="21sp" />

    </androidx.cardview.widget.CardView>
</LinearLayout>
화면에 보여줄 레이아웃 준비는 끝.
코드 작업
- RecyclerView 리스트 내부 아이템들을 관리할 'Adapter' 필요
3. Adapter클래스 작업
Adpater 틀
더보기
class FlowersAdapter: RecyclerView.Adapter<FlowersAdapter.FlowerAdapterHolder>() {
    override fun onCreateViewHolder(parent: ViewGroup, viewType: Int): FlowerAdapterHolder {
        TODO("Not yet implemented")
    }

    override fun onBindViewHolder(holder: FlowerAdapterHolder, position: Int) {
        TODO("Not yet implemented")
    }

    override fun getItemCount(): Int {
        TODO("Not yet implemented")
    }

    inner class FlowerAdapterHolder(itemView: View) : RecyclerView.ViewHolder(itemView) {

    }
}
class TestAdpater: RecyclerView.Adapter<TestViewHolder>() {
// 리스트에 표출할 데이터(또는 외부에서 받을 수 있도록 함수 조정)
val tempData: ArrayList<String> = ArrayList<String>()
// 리스트 아이템의 갯수를 꼭 명시해주어야 함
override fun getItemCount(): Int {
return tempData.size
}
// 리스트 아이템의 레이아웃을 입혀주는 함수
override fun onCreateViewHolder(parent: ViewGroup, viewType: Int): TestViewHolder {
val view = LayoutInflater.from(parent.context).inflate(R.layout.item_test, parent, false)
return TestViewHolder(view)
}
// 리스트 아이템에 적용될 데이터를 입혀주는 함수
override fun onBindViewHolder(@NonNull holder: TestViewHolder, position: Int) {
// 데이터의 해당 position위치에 적용될 값을 입혀줌
val text = tempData[position].toString()
holder.textMessage.text = text
}
inner class TestViewHolder(itemView: View): RecyclerView.ViewHolder(itemView) {
// UI레이아웃 초기화
val textMessage = itemView.findViewById(R.id.textMessage)
// TODO, Button이 있는 경우는 동작을 선언해주기도 함
// buttonApply.setOnClickListener( ... )
}
}
리스트는 Mutable로 사용하면 더 유연하다.
private val tempData: MutableList<String> = mutableListOf<String>()
그리고 데이터를 추가시 자연스럽게 추가 되는 것은 다음과 같이 notify를 해주면 된다.
    fun add(deviceName: String) {
        NLog.w("BluetoothDevicesADapter.. add.. deviceName:$deviceName, count:$itemCount")
        tempData.add(deviceName)
        notifyItemInserted(tempData.size - 1)
    }
4. RecyclerView ∽ Adapter 연결
dataBinding 사용
fun init() {
	// adapter 생성 및 연결
	val testAdapter = TestAdapter()
	binding.recyclerItemList.adapter = testAdapter

    // LinearManager 설정 : 리스트내 아이템들을 나열하기 위함
    val layoutManager = LinearLayoutManager(context = this)
    layoutManager.orientation = VERTICAL
    binding.recyclerItemList.layoutManager = layoutManager
}
앞으로는 상황에 맞게 코드를 구성하면 된다.
Adapter선언시 바로 클릭이 가능하도록 Interface만들기
position -> 형태로 받을 수 있음
/**
 * Simple RecyclerView adapter
 */
class IntegrationItemAdapter(
    private val items: List<IntegrationType>,
    private val onClick: (Int) -> Unit
) : RecyclerView.Adapter<IntegrationItemAdapter.IntegrationItemViewHolder>() {

    override fun onCreateViewHolder(parent: ViewGroup, viewType: Int): IntegrationItemViewHolder {
        val view = LayoutInflater.from(parent.context).inflate(
            R.layout.item_integration_type,
            parent,
            false
        )

        return IntegrationItemViewHolder(view)
    }

    override fun onBindViewHolder(holder: IntegrationItemViewHolder, position: Int) {
        val integrationType = items[position]

        with (holder) {
            title.text = integrationType.name
            image.setImageResource(integrationType.image)

            itemView.setOnClickListener { onClick(position) }
        }
    }

    override fun getItemCount(): Int = items.size

    class IntegrationItemViewHolder(view: View) : RecyclerView.ViewHolder(view) {
        val title: TextView = view.findViewById(R.id.title_integration)
        val image: ImageView = view.findViewById(R.id.image_integration)
    }
}
private fun setIntegrationItems(integratiosList: List<IntegrationType>) {
integrationsRecyclerView.adapter = IntegrationItemAdapter(integratiosList) { position ->
onIntegrationClicked(position)
}
}728x90
반응형